Installation
Outline
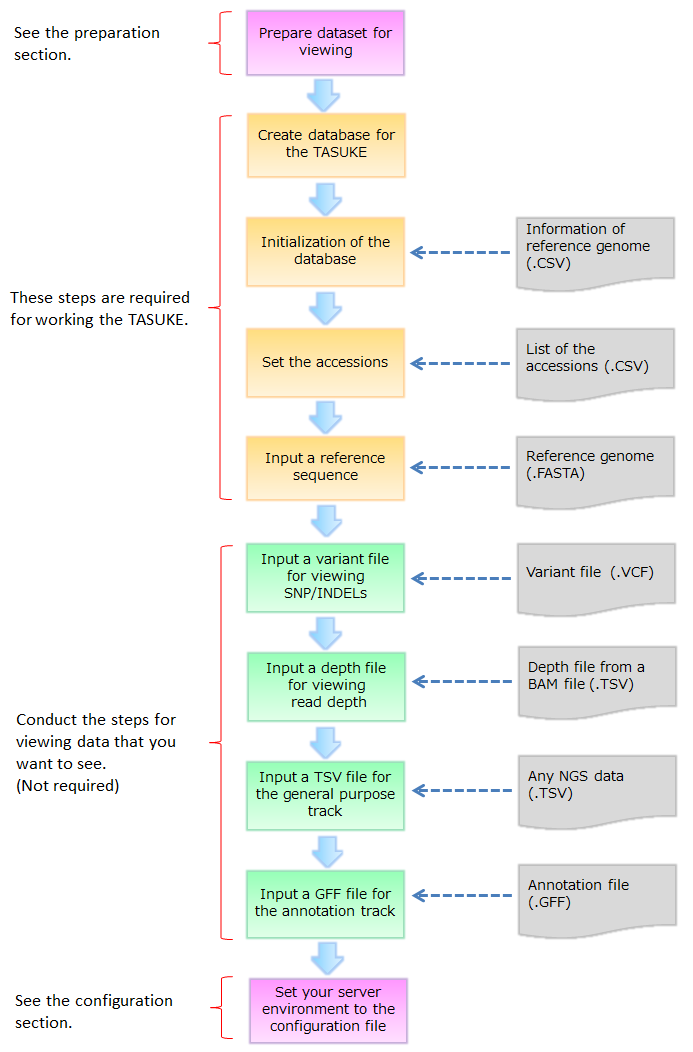
Here we explain commands of TASUKE for installation and making database. The time for creation of databases depends on genome size, number of samples and the power of server computer. Steps 5 and 7 are repeated for each accession.
We prepared a shell script as unified tool for installation. It automatically finds the files from specified directory and conducts these process.
More detail: Unified installer
0. System requirements
TASUKE browser requires the LAMP server. And it requires the Linux server that has Apache, MySQL5.0 to 5.2 with mysqli module, 5.3 or later and PHP5.0 or later.
At first you have to install php-mysql and modify php.conf file as shown below.
Installing php-mysql
$ yum install php-mysql
Modifying '/etc/httpd/conf.d/php.conf'
AddHandler php5-script .php AddHandler php5-script .php .html
1. Create a database(MySQL)
Here you create a MySQL database. First, you log-in to mysql with root authority and create a database. "database name" used here is used following installation steps.
$ mysql -u <user> -p
> Enter password: <password>
$ mysql> create database <database name>;
$ mysql> exit;
2. Initialization of database
This tool creates several tables on your database for TASUKE.
Command
When you missed in chromosome or accession list, you must create MySQL database again.
$ tasuke_init.pl -db <database name> -u <user> -p <password>
Required:
-db <database name> : Database name for TASUKE
-u <user> : User name
-p <password> : Password for the database
Optional:
-h <remote host> : To connect remote host name
-r : Delete the tables from database.
> Input csv file about chromosome's information below.
> Where is the csv file? > <information of reference genome(.csv)>
> Are you sure creating database [y|n] > y
$ mysql -u <user> -p
> Enter password: <your password>
$ mysql> drop database <database name>;
$ mysql> create database <database name>;
$ mysql> exit;
3. Add an accession
This tool registers the accessions to database.
Command
$ tasuke_accession.pl -db <database name> -u <user> -p <password>
Required:
-db <database name> : Database name for TASUKE
-u <user> : User name
-p <password> : Password for the database
Optional:
-h <remote host> : To connect remote host name
-r : Delete the accessions from database.
> Input csv file about list of accessions below.
> Where is the csv file? > <accession list(.csv)>
:
> Are you sure adding or updating database?[y|n] > y
If an id with the same name is already exist, the accession in database is updated by this tool.
When you want to delete an accession. You can delete the accession with -r option.
$ tasuke_accession.pl -r -db <database name> -u <user> -p <password>
* WARNING : This process deletes not only accession information but also depth and variant data.
4. Input a Reference Genome file (FASTA)
This tool sets reference genome to database.
Command
$ tasuke_ref.pl -db <database name> -u <user> -p <password> -f <reference genome>
Required:
-db <database name> : Database name for TASUKE
-u <user> : User name
-p <password> : Password for the database
-f <reference genome> : FASTA formatted reference genome file
Optional:
-h <remote host> : To connect remote host name
-r : Delete the reference genome from database.
The FASTA file needs line break letter per several ten to several hundred nucleotides. (e.g. 100bp/line)
When you want to input a reference genome again, you can delete it with '-r' option.
$ tasuke_ref.pl -r -db <database name> -u <user> -p <password>
5. Input a Variant (VCF) file
This tool sets variants to database.
Command:
When you want to input a VCF file again, you can delete it with '-r' option.
$ tasuke_variant_vcf.pl -db <database name> -u <user> -p <password> -n <ID> -f <variant file>
-t 'samtools' or 'gatk' or 'gatkm'
Required:
-db <database name> : Database name for TASUKE
-u <user> : User name
-p <password> : Password for the database
-n <ID> : Destination ID (accession)
-f <variant file> : Variant infromation (.VCF)
-t 'samtools' or 'gatk' or 'gatkm' : Set the program name that generated VCF file to this section
'gatkm' means multi sample VCF file generated by GATK.
Optional:
-h <remote host> : To connect remote host name
-r : Delete the variants from database.
$ tasuke_variant_vcf.pl -r -db <database name> -u <user> -p <password> -n <ID>
6. Input a Depth information file (Optional)
This tool sets depth information to database. First you need to create TSV files from your BAMs (see Preparation section).
Command:
You can delete a TSV file with '-r' option.
$ tasuke_tsv_db.pl -db <database name> -u <user> -p <password> -n <ID> -f <depth file>
Required:
-db <database name> : Database name for TASUKE
-u <user> : User name
-p <password> : Password for the database
-n <ID> : Destination ID (accession)
-f <Depth file> : TSV formatted depth information file
Optional:
-h <remote host> : To connect remote host name
-r : Delete the variants from database.
$ tasuke_tsv_db.pl -r -db <database name> -u <user> -p <password> -n <ID>
7. Input a TSV file to the general purpose track (Optional)
This tool inputs any kind of TSV formatted NGS data. To input the general purpose track, you can do it by using tasuke_tsv_db.pl with '-c' option. First you need to create TSV files from your BED or BEDgraph files (see Preparation section).
Command:
You can delete the file with '-r' option.
$ tasuke_tsv_db.pl -c -db <database name> -u <user> -p <password> -n <ID> -f <tsv file>
$ tasuke_tsv_db.pl -r -c -db <database name> -u <user> -p <password> -n <ID>
If you want to set any multiple conditions to the general purpose track, try following command. And load a TSV file using tasuke_tsv_db.pl.
Command:
$ tasuke_add_condition.pl -db <database name> -u <user> -p <password> -n <ID> -f <depth file>
Required:
-db <database name> : Database name for TASUKE
-u <user> : User name
-p <password> : Password for the database
-c <condition_id> : Condition ID(name)
Optional:
-h <remote host> : To connect remote host name
-r : Delete the conditon and tables from database.
8. Annotation track (Optional)
The annotation track on the TASUKE browser can be added from GFF files.
Command:
You can delete the file with '-r' option.
$ tasuke_track_gff.pl -db <database name> -u <user> -p <password> -f <annotation file> -t <track name>
Required:
-db <database name> : Database name for TASUKE
-u <user> : User name
-p <password> : Password for the database
-f <annotation file> : GFF(3) formatted file
-t <track name> : It sets here is directoly used for track name on TASUKE
Optional:
-h <remote host> : To connect remote host name
-r : Delete the annotations from database.
$ tasuke_track_gff.pl -r -db <database name> -u <user> -p <password> -t <track name>
Unified installer
This tool supports installation of TASUKE. It automatically detects any datasets and load the data to a database. It treats each file name as registered ID. Before running the tool, confirm relation of file names and accession ID.
Command:
$ install.sh <TASK> <Option>
TASK (Required):
all : All installation processes
init : Setting defalut tables to a database
acc : Accession informtaion
ref : Reference sequence
ann : Annotation
var : Variants
tsv : Read depth or General purpose track (defalut: read depth)
Option:
-h : Help
-r : Delete specified datasets from the database.
-g : TSV file load to general purpose track.
Set your server environment to a 'install.conf' to run the 'install.sh'. And place the install.conf in same directory as install.sh.
Modifying install.conf
##### Configuration #####
#Path of 'tasuke_bin'
SCRIPTS='/PATH/tasuke_bin/'
#Database
#mysql or oracle
BACKEND='mysql or oracle'
#Database connection
DB=<database name>
USER=<user>
PASS=<password>
#For oracle
TABLESP=<tablespace name>
#Directory for datasets
# 'install.sh' searches for datasets in following directories. And it set the datasets to the database.
# For example, this tool searches for VCF file in './tasuke_sample_data/variants/', when setting variants to the database.
#Datasets
DATADIR='/PATH/tasuke_sample_data/'
#This scripts searches for 'reference.fasta' in 'DIR_FASTA'.
DIR_FASTA='./'
#This scripts searches for '.gff' from in 'DIR_GFF'.
DIR_GFF='./'
#This scripts searches for '.vcf' from in 'DIR_VCF'.
DIR_VCF='./variants/'
#This scripts searches for '.tsv' from in 'DIR_TSV'.
DIR_TSV='./depth/'
#File format of your VCF files ['samtools' or 'gatk']
VCF='samtools'
#########################
In above case, the tool searches for any file from /PATH/tasuke_sample_data/ and load the file to the database.
e.g.) The tool searches for any files from '/PATH/tasuke_sample_data/variants/'. If the tool finds 'human001.vcf', it load the vcf to the table for human001 in your database.
Starting TASUKE
Starting
First, set below configuration at least.
Modifying conf/config.php$db = <database name>;
$host = 'localhost' or <hostname>;
$user = <user name>;
$pswd = <password>;
Access the server by web browser.
if you allocated tasuke_www/* to /(Documentroot)/tasuke/, access the following URL.
http://your_domain/tasuke
A web browser which can accept HTML5 is required. We checked the operation of TASUKE with Internet Explore(9 or later), Firefox and Google Chrome on Win and Mac.
If the TASUKE does not work, see this document.
Additional setting (Optional)
Exposing on the internet
Modifying conf/config.php
2. Access limiting for the configuration files
Modifying /etc/httpd/conf/httpd.conf
Security setting for exposing on the internet.
1. Limited-mysql-user for security protection$ mysql -u <user> -p
> Enter password: <password>
$ mysql> create user '<new user>'@'<hostname>';
$ mysql> set password '<new user>'@'<hostname>'=password('<new password>');
$ mysql> grant select on <database name>.* to '<new user>'@'<hostname>';
$ mysql> flush privileges;
$ mysql> exit;
$user = <new user>;
$pswd = <new password>;
Modifying /etc/httpd/conf/httpd.conf
<Directory "
Order deny,allow
Deny from all
</Directory>
<Apache document root>/conf" >Order deny,allow
Deny from all
</Directory>
Compressing the database
Compressing
Using database compression, data size will be reduce and the performance is slightly improve. Particularly TSV (depth and general-purpose) data size will be reduce to 1/2 to 1/6.
The TASUKE (database) does not work until finishing this processes.
Compressed database can not be update (read-only).
If you want to update data after making compressed database, decompressing is needed.
Stop the mysql-server
Myisampack and myisamchk are repeated for each accession
Decompressing
$ service mysqld stop
Move to the database directory$ cd <mysql database directory> (default: /var/lib/mysql/<database name>)
<tsv table> indicates dx_accession or dx_accession_cstmMyisampack and myisamchk are repeated for each accession
$ myisampack -v <tsv table>
$ myisamchk -rq --sort-index --analyze <tsv table>.MYI
$ service mysqld start
Load the tables$ mysql -u <user> -p
> Enter password: <password>
$ mysql> flush tables;
$ mysql> exit;
Stop the mysql-server
$ service mysqld stop
Deompressing the tables$ myisamchk --unpack <tsv table>
$ service mysqld start
Load the tables$ mysql -u <user> -p
> Enter password: <password>
$ mysql> flush tables;
$ mysql> exit;
How to update
Updating
Unpack and copy new files
2. Upgrade your database schema
This section describes how to update a TASUKE.
1. Unpack & CopyAfter download TASUKE package, set "tasuke_www" to the Apache document root.
Run the below commands, your configuration files (config.php and order.conf) are overwrited. We recommend conducting a backup of your configuration file before update.
$ tar xf ./tasuke_tools.tar
$ cp -r ./tasuke_tools/tasuke_www/* <TASUKE DIRECTORY>
Command
3. Edit the configuration file$ tasuke_db_upgrade.pl -db <database name> -u <user> -p <password>
Required:
-db <database name> : Database name for TASUKE
-u <user> : User name
-p <password> : Password for the database
Set any items to the updated configuration file.
More detail: Configuration-page
For oracle database
For more reliability and high performance, you can use Oracle database as backend database. The way of installation for oracle database is basically same process as in case of using MySQL. However, there are several different points between the two. In this section, describes these way.
System requirements
Before beginning the steps, install the Oracle database in your server. We recommends oracle database version 11g or 12c.
At first you have to install a oci8 (PHP) module and modify several files as shown below. Other items (Linux, Apache and PHP) are same condition as in case of using MySQL.
1. PHP & Oracle database
oci8
$ pecl install oci8
> Please provide the path to the ORACLE_HOME directory. Use 'instantclient,/path/to/instant/client/lib' if you're compiling with Oracle Instant Client [autodetect] :
Creating '/etc/php.d/oci8.ini'
> Please provide the path to the ORACLE_HOME directory. Use 'instantclient,/path/to/instant/client/lib' if you're compiling with Oracle Instant Client [autodetect] :
oracle home
extension=oci8.so
If the oci8 failed finding the oracle database, set the environment to apache(user).
Creating '/etc/profile.d/'
export ORACLE_BASE=
export ORACLE_HOME=
export ORACLE_SID=
export PATH=$ORACLE_HOME/bin:$PATH
export LANG=
export NLS_LANG=
export LD_LIBRARY_PATH=$ORACLE_HOME/lib
oracle baseexport ORACLE_HOME=
oracle homeexport ORACLE_SID=
sidexport PATH=$ORACLE_HOME/bin:$PATH
export LANG=
any valueexport NLS_LANG=
any valueexport LD_LIBRARY_PATH=$ORACLE_HOME/lib
If a permission related error was found, try the below commands.
Selinux
($ yum install policycoreutils-python)
$ execstack -c /usr/lib64/php/modules/oci8.so
$ execstack -c /
$ setsebool -P httpd_can_network_connect on
$ setsebool -P httpd_can_network_connect_db on
$ execstack -c /usr/lib64/php/modules/oci8.so
$ execstack -c /
ORACLE_HOME/lib/* $ setsebool -P httpd_can_network_connect on
$ setsebool -P httpd_can_network_connect_db on
2. Perl & Oracle database
Next step, install a module for connection Perl to Oracle database.
DBD::oracle
$ cpan DBD::Oracle
$ chmod +x /
$ chmod +x /
path/tasuke_bin/*
Create a tablespace
Create a tablespace for the TASUKE.
$ sqlplus user/password
> CREATE bigfile TABLESPACE TSK_SPACE DATAFILE 'tasuke.dbf' SIZE 1G
AUTOEXTEND ON NEXT 200M MAXSIZE UNLIMITED BLOCKSIZE 8K
extent management local autoallocate segment space management auto;
> CREATE TEMPORARY TABLESPACE TMP_TSK_SPACE TEMPFILE 'tasuke_tmp.dbf' SIZE 4G AUTOEXTEND off;
> exit;
Text search
This system uses a Oracle Text as free text search function. If the function is disabled, conduct following commands and enable the function.
Log on as admin user and enable a user for Oracle Text.
> alter user ctxsys identified by ctxsys account unlock;
Log on as ctxsys and grant permission for Oracle Text.
> grant ctxapp to
admin user;
After above processes, load any data to the database.
Load any data to the oracle database
This step is basically same way as in case of using MySQL. ( See this section: installation )
Run the tool (or unified installer) with a option for oracle database (-b oracle), and set the name of tablespace to 'tablespace' option (-s tablespace).
$ tasuke_variant_vcf.pl -b oracle -s tablespace -db oracle_db -u root -p pswd -n accession_01 -f accession_01.vcf -t samtools
Create user for viewing the tasuke
For expose on the internet, set limited permission to a user.
Command:
$ tasuke_grantForViewer.pl -db <database name> -u <user> -p <password> -s <tablespace> -t <temporary tablespace> -v <user name for the setting>
Required:
-db <database name> : Database name for TASUKE
-u <user> : Admin user name
-p <password> : Password for the database
-s <tablespace> : tablespace name
-t <temporary tablespace> : Temporary tablespace name
-v <user name for the setting> : User name
Optional:
-r : Delete the permission
Database Compression
Use a Oracle Advanced Compression, the data size will be reduce and the performance will be improve.
This function is enabled on a oracle database enterprise edition (EE). Express edition (XE) and standard edition (SE) can not use this function.
$ tasuke_dbCompression.pl -db <database name> -u <user> -p <password> -s <tablespace>
Required:
-db <database name> : Database name for TASUKE
-u <user> : User name
-p <password> : Password for the database
-s <tablespace> : tablespace name
Optional:
-r : Decompress the database