Installation
Outline
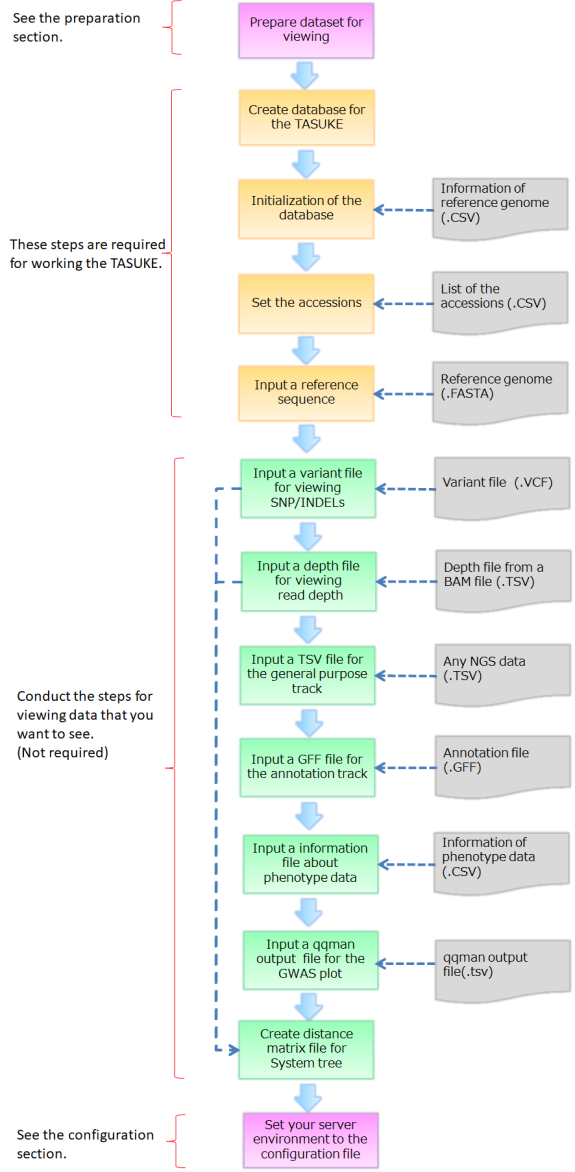
Here we explain commands of TASUKE for new installation and making database. If you want to update the TASUKE+ you are already using, please see "How to update".
The time for creation of databases depends on genome size, number of samples and the power of server computer.
Steps 5 and 7 are repeated for each accession.
We prepared a shell script as unified tool for installation. It automatically finds the files from specified directory and conducts these process. (it does not support GWAS and System phylogenetic tree.)
More detail: Unified installer
0. System requirements
If "php-fpm" is not installed, please install and enable it. If the "yum list php-fpm" command returns "Installed", it is installed.
For CentOS7(RHEL7) and earlier, the settings were as follows.
Modifying '/etc/httpd/conf.d/php.conf' and restart httpd:
For Ubuntu, add the following to the end of '/etc/apache2/apache2.conf' and restart httpd:
If php-json is not installed(you're using php5.1(or earlier) or php7.x), please install it. If the result of the command "php -m" contains "json", it is installed.
e.g.) If you want to install curl module on Ubuntu PHP7.4.
Additionally, when dealing with large datasets (hundreds of accessions or more), additional settings may be required for MySQL and PHP. See here.
TASUKE browser requires the LAMP server. And it requires the Linux server that has Apache, MySQL5.0 or later with mysqli module and PHP5.3 or later.
First, configure PHP settings. Allows PHP code to be executed on .html file.
For CentOS8(Almalinux8) or later, set as follows.If "php-fpm" is not installed, please install and enable it. If the "yum list php-fpm" command returns "Installed", it is installed.
$ yum install php-fpm
$ systemctl start php-fpm
$ systemctl enable php-fpm
Modifying '/etc/httpd/conf.d/php.conf'
$ systemctl start php-fpm
$ systemctl enable php-fpm
# Redirect to local php-fpm (no mod_php in default configuration)
<IfModule !mod_php.c>
......
<FilesMatch \.(php|phar|html)$>
......
</IfModule>
<IfModule !mod_php.c>
......
<FilesMatch \.(php|phar|html)$>
......
</IfModule>
If mod_php was installed by default, you can use its "IfModule" tag in php.conf. If the settings are separate for each PHP version, configure for your PHP version. Alternatively, you can modify all "FilesMatch" tags.
Modifying '/etc/php-fpm.d/www.conf' (Remove the commentout ";" at beginning of line)
•using php7.x
<IfModule mod_php7.c>
......
<FilesMatch \.(php|phar|html)$>
......
</IfModule>
<IfModule mod_php7.c>
......
<FilesMatch \.(php|phar|html)$>
......
</IfModule>
;security.limit_extensions = .php .php3 .php4 .php5 .php7
security.limit_extensions = .php .php3 .php4 .php5 .php7 .html
Then restart "httpd" and "php-fpm".
security.limit_extensions = .php .php3 .php4 .php5 .php7 .html
$ systemctl restart httpd
$ systemctl restart php-fpm
$ systemctl restart php-fpm
For CentOS7(RHEL7) and earlier, the settings were as follows.
Modifying '/etc/httpd/conf.d/php.conf' and restart httpd:
•using php5.x
AddHandler php5-script .php AddHandler php5-script .php .html
•using php7.x
AddHandler php7-script .php AddHandler php7-script .php .html
AddHandler php5-script .php AddHandler php5-script .php .html
•using php7.x
AddHandler php7-script .php AddHandler php7-script .php .html
For Ubuntu, add the following to the end of '/etc/apache2/apache2.conf' and restart httpd:
<FilesMatch ".+\.html?$">
SetHandler application/x-httpd-php
</FilesMatch>
SetHandler application/x-httpd-php
</FilesMatch>
Next, install additional modules as needed. These are often installed by default, but if they are not, please install them.
If php-mysql is not installed, install it. If the result of the command "php -m" contains "mysqlnd" or "mysqli", it is installed.
•CentOS php5.4 or earlier
$ yum install php-mysql
•CentOS php5.5 or later
$ yum install php-mysqlnd
•Ubuntu
$ apt install php-mysql
$ yum install php-mysql
•CentOS php5.5 or later
$ yum install php-mysqlnd
•Ubuntu
$ apt install php-mysql
php-mysql and php-mysqlnd are in conflict. Please remove the previously
installed one and then install the new one.
If php-json is not installed(you're using php5.1(or earlier) or php7.x), please install it. If the result of the command "php -m" contains "json", it is installed.
$ yum install php-json
If php-curl is not installed(Ubuntu etc.), please install it. If the result of the command "php -m" contains "curl", it is installed.e.g.) If you want to install curl module on Ubuntu PHP7.4.
$ apt-get install php7.4-curl
Perl modules "FindBin" and "DBD::mysql" are required. If you can view the documentation with "perldoc FindBin" or "perldoc DBD::mysql", they are already installed. If not, please install them.
$ yum install perl-FindBin
$ yum install perl-DBD-MySQL
$ yum install perl-DBD-MySQL
Additionally, when dealing with large datasets (hundreds of accessions or more), additional settings may be required for MySQL and PHP. See here.
[Optional]. Upgrade database schema(MySQL) from legacy TASUKE to TASUKE+
If you are currently using legacy TASUKE and you are updating it to TASUKE+, you will need to upgrade your database schema.
This operation is not necessary if you are installing TASUKE+ newly or are already using TASUKE+.
Update your database schema as follows:
Command
-u
-p
After that, by updating the web content, the update of TASUKE will be completed.
$ tasuke_update_for_gwas.pl -db <database name> -u <user> -p <password>
<database name> : Database name for TASUKE-u
<user> : User name-p
<password> : Password for the database
1. Create a database(MySQL)
Here you create a MySQL database. First, you log-in to mysql with root authority and create a database. "database name" used here is used following installation steps.
$ mysql -u <user> -p
> Enter password: <password>
$ mysql> create database <database name>;
$ mysql> exit;
2. Initialization of database
When you missed in chromosome list, you must create MySQL database again.
This tool creates several tables on your database for TASUKE.
From ver.20241122 onwards, the DB mode option(-m) has been added. You can now select "Multi-sample VCF (mvcf)" mode instead of the conventional "Single sample VCF (svcf)" mode. The DB mode determined here will be automatically detected in the following steps (the user does not need to be aware of the current DB mode).
The features of each mode are as follows.
- Single-sample VCF mode (default)
-
- Even if it is a Multi-sample VCF, it will be converted to the contents of a Single-sample VCF for each accession(sample).
- Since the site-common information (such as SnpEFF) is duplicated for each accession, increasing DB size.
- GT values are converted to "0/1", "1/1", or "1/2" (poly-ploid GT is truncated to the first two alleles. e.g. 0/1/1 > 0/1 ).
- You can add or remove accessions later without any conflicts
This mode does not support poly-ploid data. If you have single-sample VCFs for a poly-ploid (>3n) samples, please try merging the VCF files into one multi-sample VCF and register them using the multi-sample VCF mode as below.
- Multi-sample VCF mode
-
- The GT and Ploidy values in the VCF file can be displayed as is.
- Since the site-common information (such as SnpEFF) is managed in a separate table, reducing DB size.
- Generally, you cannot add or remove accessions(samples) later as this may result in inconsistent data.
Command
$ tasuke_init.pl -db <database name> -u <user> -p <password>
Required:
-db <database name> : Database name for TASUKE
-u <user> : User name
-p <password> : Password for the database
-m <DB mode> : svcf(default)/mvcf
Optional:
-h <remote host> : To connect remote host name
-r : Delete the tables from database.
> Input csv file about chromosome's information below.
> Where is the csv file? > <information of reference genome(.csv)>
> Are you sure creating database [y|n] > y
When registering the reference genomes containing more than 900 sequencens (e.g. scaffolds and contigs), you need to modify "tasuke_www/conf/config.php" after installing TASUKE as follows:
$autoDetectSerialTable = 1;
$autoDetectSerialTable = 1;
When you missed in chromosome list, you must create MySQL database again.
$ mysql -u <user> -p
> Enter password: <your password>
$ mysql> drop database <database name>;
$ mysql> create database <database name>;
$ mysql> exit;
3. Add an accession
This tool registers the accessions to database.
Command
$ tasuke_accession.pl -db <database name> -u <user> -p <password>
Required:
-db <database name> : Database name for TASUKE
-u <user> : User name
-p <password> : Password for the database
Optional:
-h <remote host> : To connect remote host name
-r : Delete the accessions from database.
> Input csv file about list of accessions below.
> Where is the csv file? > <accession list(.csv)>
:
> Are you sure adding or updating database?[y|n] > y
If an id with the same name is already exist, the accession in database is updated by this tool.
When you want to delete an accession. You can delete the accession with -r option.
$ tasuke_accession.pl -r -db <database name> -u <user> -p <password>
-----------------------------------
Deleting accession from database
-----------------------------------
Input csv file about list of accessions below.
* WARNING : This process deletes not only accession information but also depth and variant data.
4. Input a Reference Genome file (FASTA)
This tool sets reference genome to database.
Command
$ tasuke_ref.pl -db <database name> -u <user> -p <password> -f <reference genome>
Required:
-db <database name> : Database name for TASUKE
-u <user> : User name
-p <password> : Password for the database
-f <reference genome> : FASTA formatted reference genome file
Optional:
-h <remote host> : To connect remote host name
-r : Delete the reference genome from database.
The FASTA file needs line break letter per several ten to several hundred nucleotides. (e.g. 100bp/line)
When you want to input a reference genome again, you can delete it with '-r' option.
$ tasuke_ref.pl -r -db <database name> -u <user> -p <password>
5. Input a Variant (VCF) file
When you set "gatkm" for the program name(-t), Specify a comma-separated list of accessionIDs for "-n" (no spaces). The order of the accessionIDs corresponds to the order of the samples in the VCF file (sample names in the VCF are not used for DB registration). If IDs is less than the number of samples in VCF, ID is mapped from the first sample and the excess sample is ignored. If you want to ignore registering samples at the beginning or in the middle of the columns, write only commas like "-n ,,,ID1,ID2,,ID4".
A multi-sample VCF("-t gatkm") file contains a GT:0/0 variant, but it is not registered in DB by default as it will increase data size and reduce performance. Add '-z' option to register GT:0/0 variant. GT:0/0 variant will be displayed on the track in GT color mode.
When you want to input a VCF file again, you can delete it with '-r' option.
If your VCF file format is multi-sample(gatkm) and the number of samples is large, we recommend the following script(tasuke_variant_vcf_multi.pl). This script simplifies operations and speeds up DB registration by executing multiple "tasuke_variant_vcf.pl" in parallel.
"-k" option only checks the correspondence between VCF samples and DB AccessionIDs. DB registration is not performed. It is strongly recommended to perform this check before DB registration.
This tool sets variants to database.
Command:
$ tasuke_variant_vcf.pl -db <database name> -u <user> -p <password> -n <ID> -f <VCF file>
-t 'samtools' or 'freebayes' or 'gatk' or 'gatkm'
Required:
-db <database name> : Database name for TASUKE
-u <user> : User name
-p <password> : Password for the database
-n <ID> : Destination ID (accession). For "-t gatkm", a comma-separated list of IDs
-f <variant file> : Variant infromation (.VCF)
-t 'samtools' or 'gatk' or 'gatkm' : Set the program name that generated VCF file to this section
'gatkm' means multi sample VCF file generated by GATK.
Optional:
-z : For "-t gatkm". Register GT:0/0 variant(not by default)
-h <remote host> : To connect remote host name
-r : Delete the variants from database.
Apart from the above, there is a parallel wrapper script that is faster when registering large multi-sample VCF(tens to thousands of samples). Details are described later.
When you set "gatkm" for the program name(-t), Specify a comma-separated list of accessionIDs for "-n" (no spaces). The order of the accessionIDs corresponds to the order of the samples in the VCF file (sample names in the VCF are not used for DB registration). If IDs is less than the number of samples in VCF, ID is mapped from the first sample and the excess sample is ignored. If you want to ignore registering samples at the beginning or in the middle of the columns, write only commas like "-n ,,,ID1,ID2,,ID4".
A multi-sample VCF("-t gatkm") file contains a GT:0/0 variant, but it is not registered in DB by default as it will increase data size and reduce performance. Add '-z' option to register GT:0/0 variant. GT:0/0 variant will be displayed on the track in GT color mode.
When you want to input a VCF file again, you can delete it with '-r' option.
$ tasuke_variant_vcf.pl -r -db <database name> -u <user> -p <password> -n <ID>
"-k" option only checks the correspondence between VCF samples and DB AccessionIDs. DB registration is not performed. It is strongly recommended to perform this check before DB registration.
Command:
$ tasuke_variant_vcf_multi.pl -db
Either required (*1):
-n
-m
(none) : Consider VCF sample name as AccessionID.
Other options:
-h
-z : Register GT:0/0 variant(not by default)
-t
-k : TEST mode. Check AccessionIDs, and output commands for each thread, but do not perform DB registration.
Sub-action:
-r : Delete variant information for the specified AccessionIDs. AccessionID itself is not deleted. A multi-sample VCF previously used for DB registration must be specified with "-f".
(*1) priority is n > m, Only the AccIDs specified here will be registered.
(*2) See description in tasuke_variant_vcf.pl on this Wiki.
An example of the SampleName conversion table file (-m) is as follows. Samples not described here will not be registered. The order of name lines does not affect.
$ tasuke_variant_vcf_multi.pl -db
<database name> -u <user> -p <password> -f <VCF file>Either required (*1):
-n
<IDs> : Comma-separated AccessionID list (Corresponds to the order of VCF sample names) (*2)-m
<Path> : Path to "VCFsampleName > AccID" correspondence table file. VCFsampleName[,]AccID[\n]...(none) : Consider VCF sample name as AccessionID.
Other options:
-h
<remote host> :(default: localhost)-z : Register GT:0/0 variant(not by default)
-t
<num>: Number of threads(default: 4)-k : TEST mode. Check AccessionIDs, and output commands for each thread, but do not perform DB registration.
Sub-action:
-r : Delete variant information for the specified AccessionIDs. AccessionID itself is not deleted. A multi-sample VCF previously used for DB registration must be specified with "-f".
(*1) priority is n > m, Only the AccIDs specified here will be registered.
(*2) See description in tasuke_variant_vcf.pl on this Wiki.
VcfSample1,DbAccId1
VcfSample2,DbAccId2
VcfSample3,DbAccId3
......
VcfSample2,DbAccId2
VcfSample3,DbAccId3
......
6. Input a Depth information file (Optional)
You can delete a TSV file with '-r' option.
If the number of samples is large, we recommend the following script(tasuke_tsv_db_multi.pl). This script simplifies operations and speeds up DB registration by executing multiple "tasuke_tsv_db.pl" in
parallel.
"-k" option only checks the correspondence between TSV samples and DB AccessionIDs. DB registration is not performed. It is strongly recommended to perform this check before DB registration.
This tool sets depth information to database. First you need to create TSV files from your BAMs (see Preparation section).
Command:
$ tasuke_tsv_db.pl -db <database name> -u <user> -p <password> -n <ID> -f <depth file>
Required:
-db <database name> : Database name for TASUKE
-u <user> : User name
-p <password> : Password for the database
-n <ID> : Destination ID (accession)
-f <Depth file> : TSV formatted depth information file
Optional:
-h <remote host> : To connect remote host name
-r : Delete the variants from database.
A faster parallel wrapper script is available for registering a large number of samples (tens to hundreds). Details are below.
You can delete a TSV file with '-r' option.
$ tasuke_tsv_db.pl -r -db <database name> -u <user> -p <password> -n <ID>
"-k" option only checks the correspondence between TSV samples and DB AccessionIDs. DB registration is not performed. It is strongly recommended to perform this check before DB registration.
Command:
tasuke_tsv_db_multi.pl -db
-d
-m
Other options:
-h
-t
-k : TEST mode. Check AccessionIDs, but do not perform DB registration.
Sub-action:
-r : Delete depth information for the specified AccessionIDs. AccessionID itself is not deleted.
An example of the FileName conversion table file (-m) is as follows. Samples not described here will not be registered. The order of name lines does not affect.
tasuke_tsv_db_multi.pl -db
<database> -u <user> -p <password>-d
<DirPath> : Directory path where the TSV files are located. By default, filename(without extensions) is considered as AccessionID.-m
<Path>: Path to "TsvFilePath > AccID" correspondence table. If "-d" is specified, TsvFilePath is its relative path. TsvFilePath[,]AccID[\n]...Other options:
-h
<remote host>:(default: localhost)-t
<num>: Number of threads(default: 4)-k : TEST mode. Check AccessionIDs, but do not perform DB registration.
Sub-action:
-r : Delete depth information for the specified AccessionIDs. AccessionID itself is not deleted.
TsvFilePath1,DbAccId1
TsvFilePath2,DbAccId2
TsvFilePath3,DbAccId3
......
TsvFilePath2,DbAccId2
TsvFilePath3,DbAccId3
......
7. Input a TSV file to the general purpose track (Optional)
This tool inputs any kind of TSV formatted NGS data. To input the general purpose track, you can do it by using tasuke_tsv_db.pl with '-c' option. First you need to create TSV files from your BED or BEDgraph files (see Preparation section).
Command:
You can delete the file with '-r' option.
$ tasuke_tsv_db.pl -c -db <database name> -u <user> -p <password> -n <ID> -f <tsv file>
$ tasuke_tsv_db.pl -r -c -db <database name> -u <user> -p <password> -n <ID>
If you want to set any multiple conditions to the general purpose track, try following command. And load a TSV file using tasuke_tsv_db.pl.
Command:
$ tasuke_add_condition.pl -db <database name> -u <user> -p <password> -n <ID> -f <depth file>
Required:
-db <database name> : Database name for TASUKE
-u <user> : User name
-p <password> : Password for the database
-c <condition_id> : Condition ID(name)
Optional:
-h <remote host> : To connect remote host name
-r : Delete the conditon and tables from database.
8. Annotation track (Optional)
The annotation track on the TASUKE browser can be added from GFF files.
Command:
You can delete the file with '-r' option.
$ tasuke_track_gff.pl -db <database name> -u <user> -p <password> -f <annotation file> -t <track name>
Required:
-db <database name> : Database name for TASUKE
-u <user> : User name
-p <password> : Password for the database
-f <annotation file> : GFF(3) formatted file
-t <track name> : It sets here is directoly used for track name on TASUKE
Optional:
-h <remote host> : To connect remote host name
-r : Delete the annotations from database.
$ tasuke_track_gff.pl -r -db <database name> -u <user> -p <password> -t <track name>
9. Phenotype data (GWAS) (Optional)
The phenotype data can be added for using GWAS function on TASUKE.
Command:
$ tasuke_phenotype.pl -db <database name> -u <user>
Required:
-db <database name> : Database name for TASUKE
-u <user> : User name
Optional:
-h <remote host> : To connect remote host name
-r : Delete the phenotype data from database.
Enter db password:
> Where is phenotype data csv file?
(File format: Breed Name,Phenotype,Phenotype Value)
#
> Where is qqman output file?
#
> What is a phenotype of the file?
#
> Completed.
> Read the next file? [y/N]
#
<password>> Where is phenotype data csv file?
(File format: Breed Name,Phenotype,Phenotype Value)
#
<phenotype data file(.csv)>> Where is qqman output file?
#
<qqman output file(.txt or .tsv)>> What is a phenotype of the file?
#
<phenotype>> Completed.
> Read the next file? [y/N]
#
y: > Where is qqman output file?
# N: Done.
To enable GWAS function, you need to modify conf/config.php after installing TASUKE as follows:
$phenotypeFlg = "true";
$phenotypeFlg = "true";
10. Use System phylogenetic tree (Optional)

To use the System phylogenetic tree, You need to create a distance matrix and/or Newick and set its file path in the config file.
There are several ways to create them. See here for details.
- 1. Use the script included in TASUKE+ package.
-
- 1-1. Create from DB contents (tasuke_tree_dmatrix.pl)
-
- Distance matrix format
- Newick format
- 1-2. Create from multi-sample VCF file (tree_dmatrix_fromVcf.pl)
-
- Distance matrix format
- Newick format
- 2. Create in your own way
-
- Distance matrix format
- Newick format
- 3. Create Newick from an existing distance matrix
-
- Use TASUKE's "Export Current SystemTree" function
- Use getNewick.php
- Prepare Newick in your own way
Unified installer (Optional)
This tool supports installation of TASUKE. It automatically detects any datasets and load the data to a database. It treats each file name as registered ID. Before running the tool, confirm relation of file names and accession ID.
Unified installer does not support GWAS and system phylogenetic tree registration. Also, this tool assumes that multiple single-sample VCF files are used for Variant registration. Please perform DB registration by multi-sample VCF manually separately.
Command:
$ install.sh <TASK> <Option>
TASK (Required):
all : All installation processes
init : Setting defalut tables to a database
acc : Accession informtaion
ref : Reference sequence
ann : Annotation
var : Variants
tsv : Read depth or General purpose track (defalut: read depth)
Option:
-h : Help
-r : Delete specified datasets from the database.
-g : TSV file load to general purpose track.
Set your server environment to a 'install.conf' to run the 'install.sh'. And place the install.conf in same directory as install.sh.
Modifying install.conf
##### Configuration #####
#Path of 'tasuke_bin'
SCRIPTS='/PATH/tasuke_bin/'
#Database
#mysql or oracle
BACKEND='mysql or oracle'
#Database connection
DB=<database name>
USER=<user>
PASS=<password>
#For oracle
TABLESP=<tablespace name>
#Directory for datasets
# 'install.sh' searches for datasets in following directories. And it set the datasets to the database.
# For example, this tool searches for VCF file in './tasuke_sample_data/variants/', when setting variants to the database.
#Datasets
DATADIR='/PATH/tasuke_sample_data/'
#Enter the fasta file name you use as reference genome. not a directory.
DIR_FASTA='./reference.fasta'
#This scripts searches for '.gff' from in 'DIR_GFF'.
DIR_GFF='./'
#This scripts searches for '.vcf' from in 'DIR_VCF'.
DIR_VCF='./variants/'
#This scripts searches for '.tsv' from in 'DIR_TSV'.
DIR_TSV='./depth/'
#File format of your VCF files ['samtools' or 'gatk']
VCF='gatk'
#########################
In above case, the tool searches for any file from /PATH/tasuke_sample_data/ and load the file to the database.
e.g.) The tool searches for any files from '/PATH/tasuke_sample_data/variants/'. If the tool finds 'human001.vcf', it load the vcf to the table for human001 in your database.
Optimize tables (Optional)
If browsing TASUKE is extremely slow, such as "It takes several tens of seconds to scroll the track", MySQL table statistics may not have been created.
(It seems that it may occur when the database is loaded for a long time by registering a large dataset)
MySQL table statistics are normally created automatically, but you can create them manually with the script below:
Command
$ tasuke_optimize_tables.pl -db
Either required:
-a : optimize all tables(Same as specifying "-v -d -c -s")
-v : Optimize variant information tables
-d : Optimize depth information tables
-c : Optimize general purpose track tables
-s : Optimize other system-related tables
Other options:
-h : (default: localhost)
-k : TEST mode. Check AccessionIDs, and output SQLs, but do not execute it.
$ tasuke_optimize_tables.pl -db
<database name> -u <user> -p <password> -a/-v/-d/-c/-sEither required:
-a : optimize all tables(Same as specifying "-v -d -c -s")
-v : Optimize variant information tables
-d : Optimize depth information tables
-c : Optimize general purpose track tables
-s : Optimize other system-related tables
Other options:
-h
-k : TEST mode. Check AccessionIDs, and output SQLs, but do not execute it.
Running this script usually takes from tens of minutes to several hours depending on dataset size.
Installation of web contents
If you want to update already installed TASUKE+, please see "How to update".
Installation of web contents is as simple as copying files.
After download TASUKE package, copy the contents of "tasuke_www" to Apache document root under any name.
Below is an example command.
$ tar xf ./tasuke-plus.tar
$ mkdir /var/www/html/tasuke
$ cp -r ./tasuke-plus/tasuke_www/* /var/www/html/tasuke/
Starting TASUKE
Starting
First, set below configuration at least.
Modifying conf/config.php$db = <database name>;
$host = 'localhost' or <hostname>;
$user = <user name>;
$pswd = <password>;
Access the server by web browser.
if you allocated tasuke_www/* to /(Documentroot)/tasuke/, access the following URL.
http://your_domain/tasuke
A web browser which can accept HTML5 is required. We checked the operation of TASUKE with Edge, Firefox and Google Chrome on Win and Mac.
If the TASUKE does not work, see this document.
Additional setting (Optional)
Exposing on the internet
Modifying conf/config.php
2. Access limiting for the configuration files
Modifying /etc/httpd/conf/httpd.conf
Security setting for exposing on the internet.
1. Limited-mysql-user for security protection$ mysql -u <user> -p
> Enter password: <password>
$ mysql> create user '<new user>'@'<hostname>';
$ mysql> set password '<new user>'@'<hostname>'=password('<new password>');
$ mysql> grant select on <database name>.* to '<new user>'@'<hostname>';
$ mysql> flush privileges;
$ mysql> exit;
$user = <new user>;
$pswd = <new password>;
Modifying /etc/httpd/conf/httpd.conf
<Directory "
Require all denied
</Directory>
For Apache 2.2 and earlier, Modifying /etc/httpd/conf/httpd.conf
<Apache document root>/conf" >Require all denied
</Directory>
<Directory "
Order deny,allow
Deny from all
</Directory>
<Apache document root>/conf" >Order deny,allow
Deny from all
</Directory>
Compressing the database
Compressing
Using database compression, data size will be reduce and the performance is slightly improve. Particularly TSV (depth and general-purpose) data size will be reduce to 1/2 to 1/6.
The TASUKE (database) does not work until finishing this processes.
Compressed database can not be update (read-only).
If you want to update data after making compressed database, decompressing is needed.
Stop the mysql-server
Myisampack and myisamchk are repeated for each accession
Decompressing
$ service mysqld stop
Move to the database directory$ cd <mysql database directory> (default: /var/lib/mysql/<database name>)
<tsv table> indicates dx_accession or dx_accession_cstmMyisampack and myisamchk are repeated for each accession
$ myisampack -v <tsv table>
$ myisamchk -rq --sort-index --analyze <tsv table>.MYI
$ service mysqld start
Load the tables$ mysql -u <user> -p
> Enter password: <password>
$ mysql> flush tables;
$ mysql> exit;
Stop the mysql-server
$ service mysqld stop
Deompressing the tables$ myisamchk --unpack <tsv table>
$ service mysqld start
Load the tables$ mysql -u <user> -p
> Enter password: <password>
$ mysql> flush tables;
$ mysql> exit;
How to update
Updating
Unpack and copy new files
2. Upgrade your database schema (only if necessary)
This section describes how to update a TASUKE.
1. Unpack & CopyAfter download TASUKE package, set "tasuke_www" to the Apache document root.
Run the below commands, your configuration files (conf/config.php and order.conf) are overwrited. We recommend conducting a backup of your configuration file before update.
$ tar xf ./tasuke-plus.tar
$ cp -r ./tasuke-plus/tasuke_www/* <TASUKE DIRECTORY>
Since the first version of TASUKE+ (20180720), there is no DB schema change, so this operation is unnecessary.
3. Edit the configuration fileSet any items to the updated configuration file.
Alternatively, the added configuration items are documented for each version in the Release note and can be copied and pasted into the previous version's configuration file.
More detail: Configuration-page